


|
Navigation
Search
|
How to migrate to a new Windows PC
Thursday December 25, 2025. 12:00 PM , from ComputerWorld
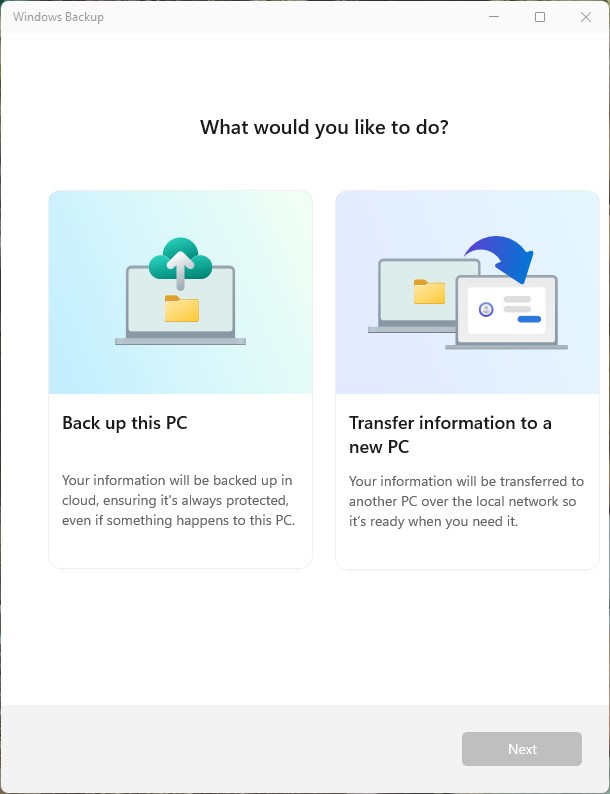
You’re in luck, though. It’s easier than ever to transfer your data from an old PC to a new one. We’ve covered multiple ways you can do it, below. In this article: Before you begin Use Windows Backup to transfer files and settings to a new PC Transfer files with OneDrive Transfer files via a File History backup Transfer files via an external drive Transfer files with a USB data-transfer cable Transfer files locally over Wi-Fi or LAN Transfer files, settings, and more via file-transfer software Install and set up apps on your new PC Transfer browser bookmarks to your new PC What to do after migrating your files and apps to the new PC Before you begin You’re probably eager to get started with your migration, but first, here are two tips that may help smooth the migration process. Migration tip #1: Clean up your files Before transferring all your data to your new PC, consider going through all your files, folders, and emails and weeding out the cruft. There’s a good chance you’ve got some ancient files and emails you no longer need. Cleaning out your old data will make transferring your data to a new PC go more quickly, and in the future you won’t have to sift through old clutter to find the files you need. Migration tip #2: OneDrive can help with migrations If you store your files in Microsoft OneDrive, you’ll find it exceptionally easy to migrate them to a new PC. OneDrive stores files locally on a Windows PC or Mac and also in the cloud. So if you use OneDrive on your existing PC, you’ll only need to sign into OneDrive on your new PC to transfer them over. OneDrive won’t transfer settings or applications, so you can use other ways to transfer those, as detailed below. Even if you don’t use OneDrive now, consider moving to it before you migrate. If you have a Windows 10 or 11 PC, OneDrive is most likely already installed on it. If not, you can download it from Microsoft. You’ll get the added benefits of having your PC constantly back up its files to the cloud so you can easily restore them or transfer them to a new PC. To move files and folders stored on your PC into OneDrive, simply drag and drop them into your OneDrive storage in File Explorer (on a Windows PC) or Finder (on a Mac). In this article, we’ll cover ways to migrate with and without OneDrive, so either way, we’ve got you covered. Migration techniqueProsConsWhat you needWindows Backup: PC-to-PC transferExtremely simple way to transfer files and settings; doesn’t require OneDriveDoesn’t transfer all settingsWi-Fi network; personal Microsoft accountWindows Backup: backup and restoreFast and easy to restore files, settings and credentials from backupDoesn’t transfer locally stored filesInternet connection for each computer; personal Microsoft account and OneDriveOneDriveSimplest way to transfer files from Windows or macOSDoesn’t transfer settings; can be time-consuming if you don’t already use OneDriveInternet connection; Microsoft account (personal, work, or school)File History backupFlexible way to transfer files; doesn’t require OneDriveDoesn’t transfer settings; can be confusing to set upExternal hard drive or USB driveDirect transfer with a removable driveFlexible way to transfer files; doesn’t require OneDriveDoesn’t transfer settings; requires an external drive; is more time-consuming than a File History backupExternal hard drive or USB driveTransfer with a USB data-transfer cableSimple solution for transferring files; doesn’t require OneDriveDoesn’t transfer settings; you need to shop carefully to find the best cablesA specialized USB cable designed to transfer dataTransfer locally over Wi-Fi or LANSimple solution for transferring files; doesn’t require OneDriveDoesn’t transfer settings; getting it to work can be difficult and flakyWi-Fi or LAN connectionTransfer via third-party file-transfer softwareCan transfer applications and settings in addition to files; doesn’t require OneDriveSoftware can be costlySpecial software for transferring files Use Windows Backup to transfer files and settings to a new PC The simplest and fastest way to transfer files and settings from an old Windows 10 or 11 PC to a new one is to use Windows Backup. Introduced to Windows 11 in 2023 and later to Windows 10, Windows Backup is primarily a backup-and-restore tool — that is, you use it to back up your PC to the cloud (specifically OneDrive), and you can restore files, settings, and preferences from that backup should your hard drive fail, if you accidentally delete files permanently, or for any other reason. You can also use it to “restore” your current PC’s files, settings, and preferences on a new PC. It still does all those things, but a recently added PC-to-PC transfer feature lets you migrate files and settings to a new PC over a Wi-Fi network. Windows Backup’s main screen, where you choose whether to back up your PC or initiate a PC-to-PC transfer. Preston Gralla / Foundry Note that Windows Backup is meant to be used with personal Microsoft accounts; it doesn’t work with work or school accounts. Your old PC can have either Windows 10 or Windows 11 installed, but your new PC must run Windows 11 24H2 or later. You can use Windows Backup to transfer your files, settings, personalizations such as wallpaper and themes, and, depending on which method you use, your passwords and credentials. Applications on your old PC won’t be transferred. You’ll have to install them after your new PC is set up. But Windows Backup’s “restore from backup” method does remember the apps you had installed on your old PC, and it puts placeholders for them on the new PC. This means you won’t have to hunt them down individually, and many can be installed with a single click. Backup and restore vs. PC-to-PC transfer The main difference between using Windows Backup as a backup-and-restore tool and using its PC-to-PC transfer feature is that PC-to-PC migration requires your old PC and new PC to be on the same Wi-Fi network. Files are copied directly from the old PC to the new one. In a backup-and-restore operation, your new PC and old PC can be anywhere with an internet connection. When files and settings are transferred from your old computer, they are first copied to the cloud and from there are copied to your new PC. Another difference is that the backup-and-restore method can save account information and passwords, while the PC-to-PC transfer method can’t. On the other hand, the backup-and-restore method relies exclusively on OneDrive, while the PC-to-PC method can transfer local files. Which method should you use for migrating to a new PC? If you’re already using Windows Backup to back up your old PC, use the backup-and-restore method — it’ll save you time. In fact, if you’ve already set up backups for your Microsoft account in Windows Backup, you’ll be steered toward the restore method when you set up Windows on your new PC. Otherwise, use the PC-to-PC method. However, after you do that, consider using Windows Backup to regularly back up your PC. That way, should anything go wrong with your new PC, you can always restore it. And it’ll be easier to migrate the next time you move to a new PC. PC-to-PC transfer in Windows Backup When you migrate files directly between your old PC and new PC, your wallpaper, themes, and many personalization settings will be transferred, but saved passwords, sign-in credentials, and drives encrypted with BitLocker can’t be transferred. If you want files from those encrypted drives to transfer, first decrypt them with BitLocker. Here’s how to do a PC-to-PC transfer: 1. On both PCs, sign into your Microsoft account. Make sure both PCs are plugged into power outlets, are on the same Wi-Fi network, and have the latest Windows 10 or Windows 11 updates. 2. Open the Windows Backup app on the PC you’ll transfer files and settings from. Select Transfer information to a new PC and click Next. 3. On the screen that appears, you’ll see the old PC’s name. Enter it into a screen that pops up on the new PC after you’ve begun its setup and click Next. Here’s the name of an old PC whose files and settings will migrated to a new PC. Preston Gralla / Foundry 4. A screen pops up on the new PC. Enter the old PC’s name here and click Next. The new PC displays a one-time code. 5. Enter that one-time code into the screen that appears on your old PC. That pairs the PCs. 6. Once they’re paired, a list of folders you can transfer appears on your old PC. The list includes Documents, Pictures, Desktop, Music, and Videos, as well as files and folders on your hard disk that aren’t on OneDrive. Make your selection and click Start Transfer. 7. The files in the folders you selected, along with your settings and preferences, now transfer from your old PC to your new one. You’ll get a summary of everything that’s been transferred. When the transfer is done, your new PC will continue its setup routine. 8. On the new PC, sign into OneDrive if you use it, and your OneDrive files and folders will be automatically transferred to it. You’ll have to install your apps onto the new PC, as well as input your passwords and sign-in data. Restore a backup from Windows Backup If you’re already using Windows Backup to back up your files, settings, and preferences on your old PC, getting them onto your new PC couldn’t be easier. All you need to do is sign into your Microsoft account on your new PC when installing it, and it will transfer the existing backup to your new PC, as detailed in step 7 below. If you haven’t yet set up a backup routine on Windows Backup, here’s how to make a backup. 1. Make sure you’re signed into your Microsoft account on your old PC, then launch Windows Backup. 2. Click Back up this PC. 3. You’ll see a screen that lets you specify the folders, apps, settings, and credentials you want to save. Here’s the first step in creating a backup to migrate to your new PC. Preston Gralla / Foundry 4. Click Folders. A list of folders whose files you can back up appears on your old PC. The list is a short one: Documents, Pictures, Desktop, Music and Videos. When you select them, they will be synced to OneDrive. If you want all your OneDrive files to be transferred to your new PC during this process, move them all to folders you create within your OneDrive Documents folder. 5. Back on the main screen, click the down arrows next to Apps, Settings, and Credentials. Choose what you want to back up. This includes installed app info, accessibility settings, accounts and passwords, themes and other personalizations, language preferences, and other Windows settings. 6. When you’re done, select Continue, and your PC will back up everything you’ve selected to the cloud. Windows Backup transferring files and settings to the cloud, which will then be transferred to your new PC. Preston Gralla / Foundry 7. During the setup process on your new PC, sign into your Microsoft account (the same one you use on your old PC). Windows will recognize that you have a backup and ask you if you want that backup to be transferred to your new PC. You’ll be shown all your backups from all your devices. Select the one you want to use and click Restore from this PC. 8. Your backed up files, settings, and preferences will be restored on your new device. The Start menu on your new PC will have placeholders for all the apps you included in the backup, but the apps are not actually installed. You’ll need to click each app’s placeholder individually. If it’s available in the Microsoft Store, it’ll be installed right away; otherwise, you’ll be directed to the web to download and install it. Transfer files with OneDrive If all your files and folders are stored in OneDrive, you can choose a quick-and-dirty way to transfer them all to your new PC: simply sign into OneDrive on your new PC, making sure to use the same Microsoft account during setup. After that, sit back and let OneDrive do its magic. You’ll have to install your apps and sign into them, and change any settings manually, but you’ll need to do that with most other ways of migrating to your new PC anyway. Transfer files via a File History backup Windows 10 and 11 include an old-school backup utility called File History that you can use to restore files (but not settings or apps) from an old PC to a new one. To use it, you’ll need an external drive. It can be any kind of drive, including a USB drive. With the external drive attached to your PC, type file history into the Windows search bar and click File History. That launches File History in Control Panel. You’ll see any external drives attached to your PC. Select the drive you want to use and click Turn on. Your files will be copied to the drive. Using File History from Control Panel in Windows 11. Preston Gralla / Foundry To exclude folders from the backup, select Exclude folders from the left navigation menu, click Add, and choose the folders you want to exclude. To copy the backed-up files to your new PC, plug the drive into it, repeat the above steps, and click Restore personal files. For more detailed instructions, see “How to use File History in Windows 10 and 11.” Transfer files via an external drive To migrate files and folders to your new PC, you can dispense with using any special software at all, and instead connect an external hard drive, SD card, or thumb drive to your old PC, copy your files to it, then eject that device from the old computer, plug it into the new PC and copy the files to that new PC. The trick here (besides having enough storage capacity on your transfer drive) is to have your files and folders organized well enough so you get them all. We recommend that you use the same folder organization on your new PC as on your old computer, at least to start. Note: If you are transferring files from a Mac to a PC, the external hard drive must be formatted as MS-DOS, not NTFS or APFS. SD cards and thumb drives use the same FAT32 format on both macOS and Windows, so if your files fit on those storage devices, that’s often easier than using a hard drive. A note about transferring emailIf you use a cloud-based mail service such as Gmail or the Outlook web app, you don’t need to transfer your mail files. However, if you use client-based email software (like the desktop version of Outlook), you’ve got some work ahead of you.Direct file transfer will not move your locally stored email files to the new PC, and copying them to a new PC often doesn’t work because of how they are tied to the email application’s OS settings. We recommend you make sure all your emails are stored in your email server so they can just sync to the email client on your new PC. The Microsoft Outlook client supports several servers, not just Microsoft’s Exchange and Microsoft 365 typically used in business.IT retention policies may limit how far back emails are stored on the server, so you may have local emails you can’t transfer that way. In that case, Microsoft Outlook does let you import the local.PST files to a Windows PC from the Outlook app on another Windows PC or Mac; Microsoft has provided export instructions and separate import instructions.Different client versions of Outlook have different maximum size limits for.PST files that can be transferred from one computer to another. So if you’re planning to move.PST files, read this Microsoft article to find out those limits and get advice on ways you might be able to reduce the size of.PST files before trying to transfer them.Local contacts and calendar entries likewise are very difficult to directly transfer from one computer to another, and it is best to make sure they are stored on a server, such as Exchange, Microsoft 365, Google Workspace/Gmail/Google Calendar, or iCloud, so they will sync to your contacts and calendar apps on your new PC. Your contacts and calendar apps may have an export feature that you can try. (You can often export individual contacts as a VCF file, for example.) These days, few contacts and calendar apps are not server-based, so chances are very high your contacts and calendar entries are stored somewhere they can be synced. Transfer files with a USB data-transfer cable One of the simplest ways to move files from your old PC to a new one is to use a USB data-transfer cable. You can’t use just any USB cable; it needs to be one specially designed to transfer data. When you plug the cables in, they often automatically install the drivers they need. They also come with file-transfer software that tends to be bare-bones but does the trick. You can easily find the cables online. If you’re transferring files between two PCs that have USB-C ports, check out this PCWorld article with recommendations for the best ones. Transfer files locally over Wi-Fi or LAN If you’d like, you can move your files from your old PC to your new PC via Wi-Fi or a LAN. To do it, the PC with your files and the PC to which you want to transfer them need to be on the same Wi-Fi or Ethernet network. To do it, you need to turn on network discovery and file sharing on both the PCs. In Windows 11, select Settings > Network & Internet > Advanced network settings > Advanced sharing settings, and turn on the toggles for Network Discovery and File and printer sharing. In Windows 10, select Settings > Network & Internet > Network and Sharing Center. That will launch the Control Panel. In Control Panel, select Change advanced sharing settings from the right side of the screen. On the screen that appears, in the Network Discovery section, select Turn on network discovery, and in the File and Printer sharing section, select Turn on file and printer sharing. You can now drag and drop files and folders from your old PC to your new one using Windows Explorer. Click Network at the bottom of the left-hand pane in File Explorer, find the new PC to which you want to transfer files and folders, and copy them to it. Note that transferring files this way can be flaky — you may have problems with your PCs showing up on the network. Setting it up takes only a few minutes, though, and if it doesn’t work you can always use another method in this story to transfer the files. (For troubleshooting help, you may want to use the advice in PCWorld’s article “Windows 11: How to set up a local network.”) Transfer files, settings, and more via file-transfer software If you want more hand-holding in your file transfer, you can buy and use a utility like Laplink’s $60 PCmover Professional, which has been around for decades. It works over your network (either Wi-Fi or Ethernet) or via Laplink’s Ethernet or USB cables (these cost extra). It lets you choose which files and folders to transfer, and will transfer your settings, bookmarks, and applications too. You can migrate from old Windows versions to later Windows versions, as well as between the same versions. (One exception: you cannot migrate from Windows XP to Windows XP.) Note: You need administrator privileges in Windows to use all of PCmover’s capabilities. Before you transfer any applications via a utility like PCmover, sign out of or deactivate any apps on your old computer. Most software these days is tied to an online account that limits the number of active installations or has digital rights management to prevent piracy via copying. You don’t want the transfer to be seen as a piracy attempt or as an additional installation that counts against any limit you may have. Another option is EhlerTech’s USMTGUI, a graphical front end to Microsoft’s command-line User State Migration Tool. USMTGUI (like USMT) transfers only settings and associated data like emails, not applications. The home version pricing starts at $10, and the corporate license pricing starts at $300. Install and set up apps on your new PC Regardless of the transfer method you use, you almost certainly will have apps to reinstall, depending on what IT did for you in preparing your new computer. (PCmover Professional will transfer most apps; its documentation describes its limitations.) On your new PC, re-download the apps you need and sign in as required. You’ll find some apps on the Microsoft Store, while others you’ll need to download from the software vendor’s website. As noted earlier, if you restore from a backup in Windows Backup, you’ll find placeholders for your apps that can speed up this process. In most cases, you’ll need to set up your applications’ preferences on the new computer, so set aside the time to do that. Transfer browser bookmarks to your new PC You also will want to transfer your bookmarks from your old computer’s browser to your new computer’s browser. There are three methods: direct syncing between the same browser and exporting a browser’s bookmark files to import into a different browser. The first method keeps the browsers in sync, whereas the second method is a manual approach for when you are moving to a new computer (or browser) and won’t use the old computer (or browser) anymore. Chrome, Firefox, and Edge all sync bookmarks across all your devices if they are all signed into the same account. Just enable syncing in each browser on each device you use. To be clear, you can sync only to the same browser, such as from Chrome to Chrome. For situations where your browser is not signed into the same account as your old computer, the major browsers all have a facility to export and import bookmarks via files: Google Chrome: To export bookmarks, click the vertical three-dot icon at the top right of your browser window, then select Bookmarks and lists > Bookmark Manager from the menu that appears. Click the three-dot icon to the right of the search bar and select Export bookmarks. To import bookmarks, follow the same procedure but choose Import bookmarks instead of Export Bookmarks. Mozilla Firefox: To export bookmarks, click the Menu button (three horizontal lines) on the top right of the screen, then select Bookmarks and click Manage bookmarks at the bottom of the screen. Select Import and Backup from the top of the screen that appears and choose Export Bookmarks to HTML. To import bookmarks, follow the same procedure but choose Import Bookmarks from HTML instead of Export Bookmarks to HTML. Microsoft Edge: Click the Favorites button (the star icon), then click the three-button icon at the top of the panel that appears and choose Export favorites. To import bookmarks, follow the same procedure but choose Import favorites instead of Export favorites. What to do after migrating your files and apps to the new PC When everything is transferred, be sure to take these steps to protect your data: Sign out of all your accounts on the old computer. This includes Microsoft, Google, browser sync, passwords, financial information, cloud storage accounts, and others. You don’t want the next owner to be able to use your accounts, especially any that may connect to credit and debit cards or bank accounts. Consider wiping/reformatting the old computer, but check with IT first if it’s a business computer, in case they need to keep it as is for some period of time for regulatory or HR policy reasons. If your own computer and you’re feeling particularly paranoid, you can remove the old hard disk and physically destroy it. Back up your new PC. Don’t forget to establish a regular backup routine on your new Windows computer, whether it’s through File History, image backup software, or the new Windows Backup facility in Windows 11. This article was originally published in November 2020 and most recently updated in December 2025. Further reading: How to switch from Android to iPhone How to switch from iPhone to Android How to move data between your Android phone and a computer How to move files between an iPhone and Android phone
https://www.computerworld.com/article/1638368/how-to-migrate-to-a-new-windows-pc.html
Related News |

25 sources
Current Date
Dec, Thu 25 - 17:06 CET
|